Removing white background with Photoshop revisited
Back in November last year I created a Photoshop action to remove the white background from line art. Recently though, I greatly simplified the action.
Previously it had converted a bitmap mode image to RGB before proceding to remove the "white" page background. This was because my usage of the action was when needing to remove the white page background from scanned lineart or lineart drawn in an application that does not support transparency (Smith Micro's Manga Studio in my case).
My post back in November wasn't a tutorial; it told what the action would do and why, and was available to download, but recently on Twitter I was badgered into explaining how-to and so I figured it's worthwhile putting it in a tutorial here. It is also why I simplified the action: it should do just the one thing, remove the white.
So here are two methods of removing a white, or black, or indeed any solid colour background from an image.
Preparing the image

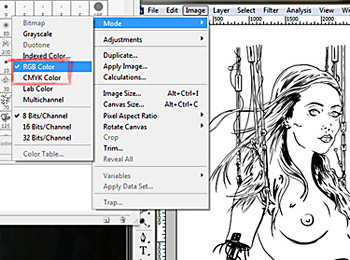
First, you need to ensure the image is prepared. For either method to work use Image > Mode to ensure the image's mode is anything other than Bitmap or Multichannel.

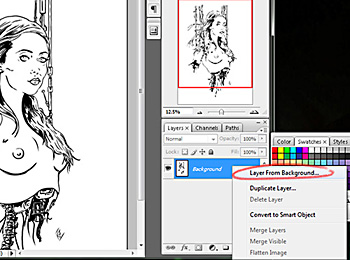
Second, you must make a layer from the background. Either right-clicking on the Background layer (Cmd-click on Mac) and selecting Layer From Background from the context menu or simply double-click the Background layer.
The image is now ready to have it's background removed. There are two methods of doing this: with Channels (below) and with Blending Options (next page). Each method has its pros and cons.
Removing the background with Channels
Removing an images' background with channels works best with solid colour images, not delicate shades of grayscale or colour. Line art for instance. If you try this method with a detailed colour image, it is really going to suck! It's strong point is that is can very accuratly remove any solid colour. It is permanent, so you may wish to save a backup before proceeding.
First, select the entire image (Select > All or Ctrl+A/Cmd+A) and copy (Edit > Copy or Ctrl+C/Cmd+C).

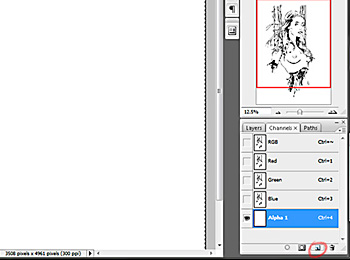
Now click the Channels tab and click the Create New Channel button. As soon as the new "Alpha" channel is created (named Alpha 1) the image will disappear. Don't panic, it's just that by creating the new channel the visibilty of the images other channels have been toggled off.
Paste the copied image to the new channel (Edit > Paste or Ctrl+V/Cmd+V) and the image will reappear.

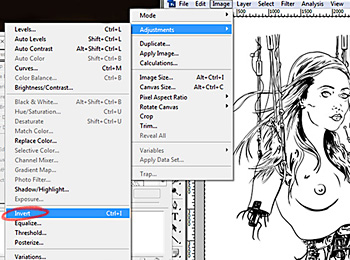
Now invert the image (Image > Adjustments > Invert Edit > Paste or Ctrl+I/Cmd+I).